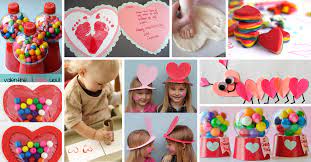
Valentine’s Day may only be one day, but that doesn’t mean you can’t make the most of it, especially if you’ve been itching to try some Valentine’s Day crafts. Although they’re not just for children, Valentine’s Day crafts for kids are always fantastic. Nowadays, anyone may participate in the joys of making, especially around Valentine’s Day. Making homemade Valentine cards is one way to express your creativity, but there are countless additional options, including easy décor and meaningful homemade gifts.
Consider making something on February 14 in addition to (or instead of) giving him gifts for Valentine’s Day. Children will like helping to decorate or string garlands for a party, whether they are attending a school event or you are organising one at your house. Valentine’s Day crafts for kids and adults are included in this list of projects (together with supply lists and directions), and many of them can be completed by either group. (Just make sure that children are always under adult supervision while crafting.)
Younger kids will enjoy joining you or working on a few crafts on their own, and teens or tweens who are just starting out in creating will adore producing these Valentine’s Day crafts as decor or inexpensive gifts for their pals. Pick your craft, get your supplies, and get started: Valentine’s Day will be here before you know it.
Table of Contents
Children’s Valentine’s Day Gifts
Tone Box in Gold
Crafts for Valentine’s Day: Gold Tone Box
THEODORE FRIEDMAN
Color blocking is a style that works at any time. Create your own color-blocked box for a present that looks contemporary and complements even the most simple décor.
You’ll require:
Make careful you tightly wrap plastic wrap around a piece of the box. The gold tone design will depend on whether the plastic is wrapped diagonally or straightly.
The box was spray painted. Once the package is entirely dry, take off the plastic wrap.
Colorful enamel pins are once again a popular accessory. For Valentine’s Day, make a cute variation that fits in on a jean jacket or a backpack.
You’ll require:
forms of natural wood hearts
A vibrant acrylic paint colour
Miniature alphabet stamps, paintbrush
Glue the pinbacks.
How-to:
Acrylic paint in a vibrant colour should be used to paint the heart shapes. Once they are dry, add your choice of phrase using small alphabet stamps.
Attach tiny pin backs with adhesive to finish the craft.
THEODORE FRIEDMAN
For a more unique set of party decorations this year, customise balloons.
You’ll require:
Mylar heart-shaped balloons that are inflated (available at party supply stores)
Sticky vinyl lettering (available at office supply and craft stores)
How-to:
Visit your neighbourhood party supply store and buy inflated heart-shaped balloons.
Stick-on letters in the form of frequent conversation heart phrases should be adhered to each balloon.
Glowing Box
All of us could use a little more glitz in our lives. For a little of shine that will last for a while, use a sturdy box as your basis.
You’ll require:
a small, lidded square box
Brush with chunky glitter Glue
How-to:
Using a paintbrush, spread a generous layer of glue across the top of the lid.
On the lid, scatter the glitter. Allow it to totally dry.
Give the box a second coat of glue and glitter.
Pop-Up Box Heart
Hearts that seem to fly from the lid will make your present box come to life.
You’ll require:
rectangular cardboard jewellery box with lid
Red, pink, and purple construction paper
Scissors
Staple dots
How-to:
Cut out various-sized heart shapes. You’ll need roughly 30 shapes for a tiny box.
Use glue dots to attach the hearts on the box, arranging them in layers and in various directions.
Bordered Box
No matter what kind of treats you’re giving out—store-bought or homemade—help them look a little fancier with a homemade (and reusable) container.
You’ll require:
rounded lidded tin box
coloured tissues
Scissors
Stick of glue
How-to:
Cut tissue paper into 34 inch wide strips.
Make horizontal fringes on the strips, spacing them roughly 14 inch apart.
Start at the bottom of the lid and stack the strips one on top of the other to adhere them to the box’s lid.
Remove any extra tissue paper from the area surrounding the lid.
Totes with hearts
By adding vibrant pop art that resembles the well-known heart-shaped candy to a plain canvas bag, you can take the conversation heart theme a step further.
You’ll require:
bag made of plain canvas
Heart-shaped paintable and adhesive letters
Foam brush
How-to:
Simply attach a heart-shaped stencil to the bag, use adhesive letters to write your message in the heart’s centre, and then paint over the letters to fill the heart form.
Use a foam brush to dab instead than swiping in a side-to-side motion to produce smooth lines.
Etched Glass
Kids can participate in this craft’s stencil-making process and create whatever design or picture they like. Stencil their name or initials to make this a gift for them.
You’ll require:
Knife of craft
Ink on paper
Tape
clear glass
Paint brush \sGlass etcher
How-to:
Using a craft knife and contact paper, create a stencil. Your initials, a heart, or any Valentine’s Day emblem are all acceptable designs.
Apply contact paper stencil on cup using adhesive.
Apply glass etcher to the inside of the stencil and onto the glass using a paintbrush.
Cut the contact paper off. The etcher will have eaten away at the glass, and you’ll be left with a stunning design!
Box of heart-shaped truffles
What could be more appropriate than to give homemade chocolate truffles in a homemade box?
You’ll require:
Cardstock
Box design
Scissors
Stick of glue
How-to:
Print the box template, then cut it out. Cut out the tracings from the cardstock.
Fold the paper along the single lines on the template as you assemble the box. To assist you tie the heart top together, cut slits where the bold line appears on the template. Using a glue stick, fasten the box’s sides.
Box of washi tape
Utilize fun washi tape designs for this Valentine’s Day project.
You’ll require:
a little lidded box (can be rectangle or square)
various sizes of washi tape
How-to:
Create patterns on the box’s lid and base using washi tape. Use your imagination while choosing the layout and colour scheme; consider a grid or diagonal pattern.
a creation by Morgan Levine.
Emoticon Box
Both children and group chat buddies will like receiving some goodies in a box with their preferred emoji on top.
You’ll require:
rounded lidded tin box
construction paper in the colours yellow, pink, and black
Scissors
Glue or double stick tape
How-to:
Trace the lid of the box onto the yellow paper. Turn off.
Cut a “smile” shape from the black paper and two hearts from the pink paper.
Use double-stick tape or glue to attach the yellow circle to the lid. Attach the smile and the heart eyes on the box.
Gift boxes with conversation hearts
Use your imagination when it comes to the wrapping if you’ve already chosen a truly wonderful present for your Valentine. By applying a coat of vibrantly coloured paint in the hues of white, mint, pink, orange, yellow, and purple, you can transform a standard heart-shaped box into something that resembles the tastes found in a box of conversation hearts.
You’ll require:
simple heart-shaped box
paint brushes
Stamps and paint Red ink
Indelible marker
How-to:
paint cans (inside and out). Enable complete drying.
Once dry, decorate the lids with your own lovely sentiments using stamps, red ink, or red permanent pen.
Valentine’s Day party invitation handwritten by hand
Even a low-key gathering ought to be memorable. Invite the kids to participate in creating an interactive, possibly messy Valentine party invitation.
You’ll require:
Paper Envelopes Hand-washable Paint Invitation (download it here)
Newspaper
How-to:
Save and print the invitation.
On a flat surface, spread out the newspaper. Let your child press his or her handprint onto the invitation by dipping it into the paint. Set apart for drying.
Give the party’s information.
Cupstickers for a Valentine’s Day party
Every celebration requires a signature beverage. With these festive stick-on labels, you can transform paper cups into fun party decorations whether you’re serving apple juice or chocolate milk.
You’ll require:
Cups
created labels (download here)
empty labels
How-to:
Print the labels on stickers after downloading them. (Printing guidelines will be included with the labels.)
Put cups on or let the youngsters choose their own.
Decorative Cupcake Liners
Your tiny Romeo is prepared to woo. The roses are crimson, the violets are blue. How are they going to demonstrate that their love is real? Starting with a durable, hand-made bud is a good idea.
You’ll require:
muffin liners (in assorted colors)
tee shirts (in green)
craft glue
Knife of craft
How-to:
Place five to six cupcake liners atop one another. Make a hole in the middle of the stack with a craft knife.
Apply a little amount of hot glue to one end of a pipe cleaner. After that, adhere one liner to the glue. Set apart for drying.
Scrunch the liner shut after the glue has cured to give it the appearance of a flower bud.
Repeat Step 2 with the extra liners, glueing them on the pipe cleaner, scrunching them together, and sliding them onto it.
The pipe cleaner should be coiled into a leaf shape after being wrapped around the base of the bloom.
Stick Hearts Pixie
Cupid faces some adorable opposition. Make a variety of small hearts, and have the kids distribute them to their friends, classmates, and relatives.
You’ll require:
Construction paper or a variety of coloured paper
Scissors (you may also use pinking shears or fancy edged scissors) (you could also use pinking shears or fancy edged scissors)
metallic pen ink
Pompom sticks
craft glue
How-to:
From the paper, cut out several heart shapes. Make a little circle in the centre of the hearts after folding them in half.
Kids can draw pictures or write lovable sentiments to decorate their hearts.
Pixie sticks should be inserted through the hearts.
Draw and cut out the arrow heads and backs on a different sheet of paper. Glue is used to affix the bows’ top and ends. Set apart for drying.
X and O Candy
It’s now time for a snack. This Valentine’s Day, it’ll be love at first bite with these festively designed goodies.
You’ll require:
ingredients needed to make goodies (marshmallows, rice cereal, butter)
cookie cutters with a Valentine’s theme
the colourant (if you wish)
Candle paper
How-to:
To make the goodies, adhere to the recipe (this can be found on the back of the cereal box). Add food colouring to the mixture, if so desired.
Spread wax paper across a flat surface. Flatten mixture after bringing it here. Utilize cookie cutters to create patterns.
Put wax paper on a tray, then place in the refrigerator.
Heart-shaped hairpin
Surprise your little one with a new item that goes with the party theme.
You’ll require:
sheets of adhesive felt (in pink, red, white)
metal hair clip with one prong
Scissors (you can also use pinking shears or fancy edged scissors)
craft glue
Bows for scrapbooking that are little, already fashioned, and adhesive-backed. accessible at your neighbourhood craft store)
How-to:
Cut felt into heart-shaped forms. Create a selection in two sizes.
Taking off the adhesive backing, place the smaller heart on top of the larger one. Put some extra craft glue on for added security.
Flip the smaller heart over once it has dried and fasten the larger heart on the metal clip. Secure and place somewhere to dry.
Put the bow on top and finish.
Valentine pasta
This crafting session primarily encourages playing with food. Let the kids make heart-shaped, uncooked pasta into handcrafted, emotional messages (or any noodle that catches your fancy).
You’ll require:
Construction paper or a variety of coloured paper
Pasta cut into hearts
Spaghetti (to make the stem)
craft glue in white
Pencil or crayon, depending
Paintbrush \sNewspaper
How-to:
Use newspaper to cover a flat surface. On the colourful paper, instruct children to write (or draw) their messages.
Using a paintbrush, apply glue to one side of the pasta hearts. Attach uncooked pieces to the paper using the line drawings as a guide. Set apart for drying.
Valentines made with hearts
There’s sew much love that goes into producing this pint-size paper heart. (We swear it’s easy if you use our printable template; it really is.) The youngsters can sew on their own after you have set up the craft.
You’ll require:
patterned paper stock
Scissors
a screwdriver (awl or thumbtack will also work)
broad, pointy needle
Downloadable Yarn PDF Heart
How-to:
Print the heart PDF by downloading it.
Follow the prefabricated heart shape and poke holes in the paper stock over each dot with a screw punch.
Sewing yarn through the holes requires a large, blunt needle.
Snow globes with glitter
In just a few easy steps, you can transform an empty kitchen jar into a treasured Valentine’s Day keepsake.
You’ll require:
full jar (for this project, almost any size will work: olive, baby-food, pickle)
tee shirts
Glitter Craft glue Thin brick-sized floral foam (available at craft stores)
How-to:
Attach the jar’s lid using floral foam glue. Set apart for drying.
Pipe cleaners can be used to create heart-shaped patterns. Stick into the foam strip once the task is finished.
Water should almost reach the jar’s brim. Embrace sparkle.
Shake the jar with the lid on.